|
|
Chapter 4: Marking Up in XMLHow do I markup a document in XML? Important Note: Because each project gets marked up differently, before you begin the markup phase of a project you will be trained personally either by a supervisor or someone else who has experience doing markup in that project already. This chapter just serves as an introduction to the program and the opening steps for markup. In your training session, you will learn to use tags and codes used for XML and HTML, and you will learn another file type format, JPEG, used for adding pictures and images to web pages. 1. Double click the My Computer icon on your desktop and select the C (C:) drive (see Figure 1).
Figure 1: Example of My Computer icon 2. In the C: drive, double click the etext folder, NoteTab Pro, then open the NoteTab Pro program by double clicking the NotePro icon (see Figure 2).
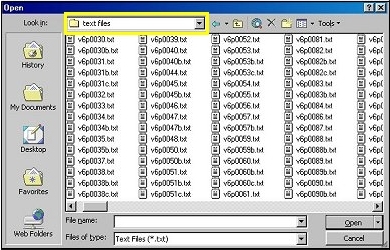
Figure 2: NotePro icon 3. Minimize the NoteTab Pro program window. 4. In the L (l:) drive, locate (but do not open!) the text file document you need to markup. For example, if you needed to markup article c on page 822 of Volume VI (6) of Kappler, double click the My Computer icon, select the L (l:) drive, the Digitization folder, the Kappler folder, the Volume VI (6) folder, and open the text files folder, like this: (l:)>Digitization>Kappler>vol6>text files Once in the text file folder, locate the text file you need to markup. From the example preceding, you would locate v6p0822c.txt. 5. Right click the text file to bring up the right-click menu. 6. Select Copy from the right-click menu to copy this text file and paste it into a different folder, but be sure you copy this file; do not Cut it! 7. In the C: drive, open the etext folder, and open the document folder. 8. Paste the text file into this document folder. Important Note: You will always keep the files you are working on in this documents folder; once you have finished marking up the file, however, you will move it back to the L (l:) drive. 9. Maximize the NoteTab Pro window. 10. In the toolbar at the top of the NoteTab Pro window, click File, Open, or click the open folder icon to bring up the Open file dialog box. 11. From the Open file dialog box, in the Look box (see Figure 3), select the text file you need to markup in the document folder in the etext folder in the C drive.
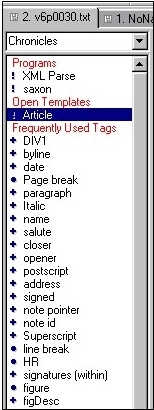
Figure 3: Open file dialog box, with Look in box highlighted 12. In the column on the far left side of the screen (see Figure 4), under the Open Templates heading, double click Article.
Figure 4: Articles template selected A template with XML tags displays. You can recognize the tags because the text will be enclosed within arrows like these: < > Examples:<?xml version="1.0"?> and <!NOTATION jpg SYSTEM "JPEG"> 13. After you open the text file in NoteTab Pro, it will open in a single window, covering the article template you just opened. To get both screens to display side by side, follow the proceeding steps. 14. First, you should note that above the far left column you now have two tabs. The first tab should have the name of the text you are going to markup, and the second one should read "NoName01.txt." Be sure the first tab labeled with the text file name is selected (see Figure 5).
Figure 5: First tab selected 15. From the toolbar at the top of the NoteTab Pro window, click Document. 16. Select the Second Window option (see Figure 6). This action will put the template on the left screen and the text file on the right screen.
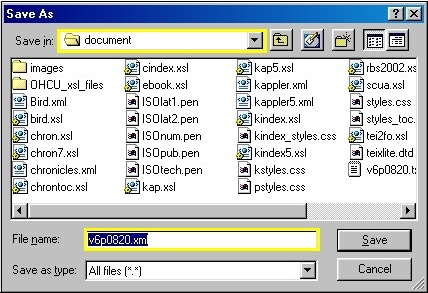
Figure 6: Document drop down menu Note: Before you continue with the markup, save this document with a new extension by following these steps. 17. Select the second tab labeled "NoName01.txt." 18. From the toolbar, click File, select Save As to bring up the Save As dialog box (see Figure 7).
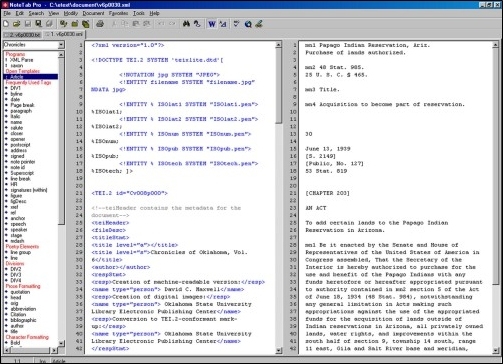
Figure 7: Save As dialog box, with Save in box and File name box highlighted. 19. In the Save in box of the Save As dialog box, use the drop down menu to go to the C drive, select the etext folder, and open the document folder. 20. In the File name box (also in Figure 7) name the file exactly as it is in the text file, according to its volume number and page number, but you must change the extension from .txt to .xml. 21. Click Save. 22. The XML tags in the screen on the left should change to blue, but the rest of the text of the text will remain black (see Figure 8).
Figure 8: Split screen in NoteTab Pro with blue XML tags 23. Next you will enter the rest of the article information into the XML document. Once you have done this, you will parse the document. Parsing a document checks all of the text and entries to make sure they conform to the specified guidelines for a project. If everything conforms, parsing also generates the HTML files we will use for Internet publication. 24. Before going any further, you must get someone to help you to show you how to markup for each individual project. This person will show you how to cut and paste the the text into the correct tags, what the different tags mean, and how to treat special characters, how to parse a document, check your work in a browser and so forth.
|